Paramania Revolution Powerglider
Owner’s Manual V1
Contents
2.1
Design
2.2
Construction
2.3
What your new Revolution powerglider comes with
2.4
Setting up the controls
3.1
Flying with and without a motor
3.2
Flying Under Power
3.2.a Forward Launching the Revolution
in Nil Wind
3.2.b Reverse Launching
in Stronger Winds
3.2.c The Climb
Out
3.2.d In Flight
controls
3.2.e Using the Trimmers and Speed
Bar
3.3
Landing
3.3.a Power-off
Landings
3.3.b Power-on Landings
3.4 Advanced
manoeuvres
3.5 Golden Rules!!!
4.1
Basic Care
4.2
Periodic Maintenance
4.3
Repairs
4.4
Care and maintenance of your power unit
5.1
Riser diagrams (RRD1, RRD2, RRD3)
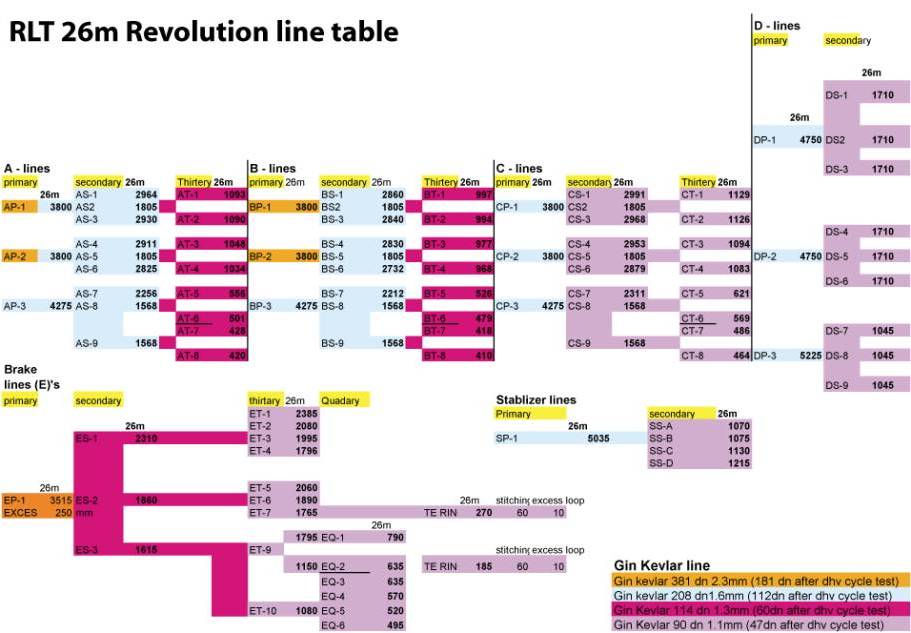
5.2
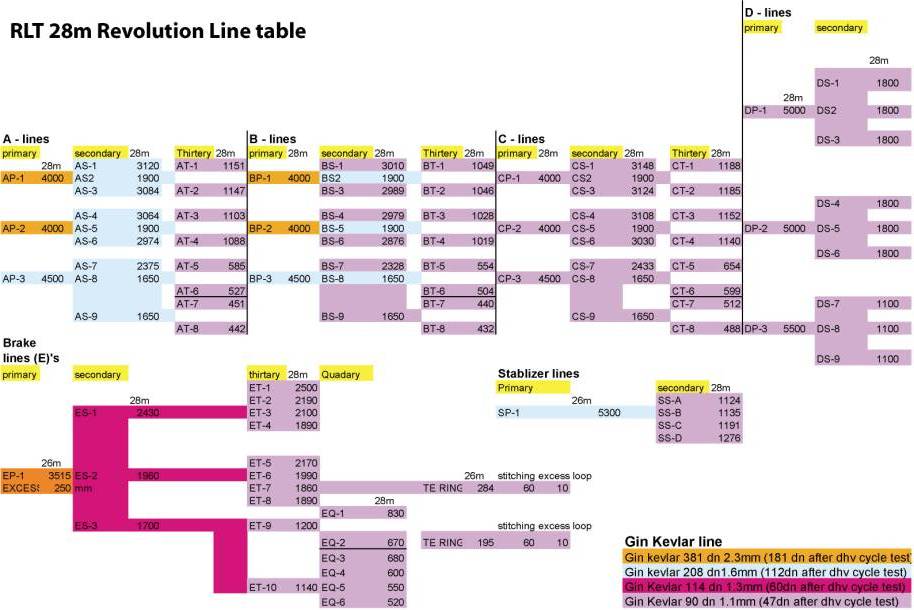
Lining tables & diagrams
(RLD01, RLT28m, RLT26m, RLT23m
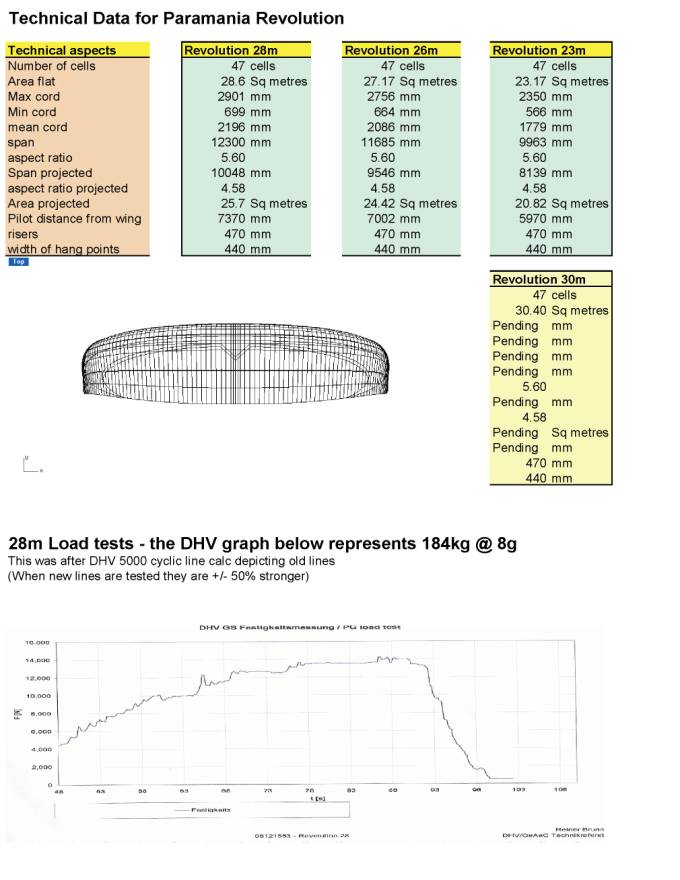
5.3
Technical Specifications (table RSP01)
5.4
CEN Data Labels
6
Revolution Users Newsgroup
The
purpose of this manual is to offer guidelines to the pilot in the use of the
Paramania Revolution powerglider and is in no way intended to be used as a
training manual for this or any other paramotor wing or paraglider. You may only fly an aircraft of any
description when qualified to do so or when undergoing training from an
accredited School or Instructor.
It
must be understood that flying can be a dangerous activity unless undertaken by
properly trained people flying in a responsible and disciplined manner. As the owner of a Paramania Revolution
Powerglider, you have chosen to fly one of the safest aircraft of its type
available.
Nevertheless,
in the final analysis, any aircraft is only as safe as the pilot flying it and
it is incumbent upon you to make sure that you have the required training and
experience to make your own judgements about how, where and when you fly.
Paramania, its Directors, Employees and Agents can accept no liability for any
consequences arising from the use of their products howsoever caused.
Particular
attention must be paid to the danger of injury to the pilot and bystanders from
a rapidly rotating propeller, which can break and inflict injury at some
distance and the dangers inherent with flammable fuel and other combustible or
fusible materials.
Paragliding
is a relatively new activity that is still evolving and powered paragliding
(paramotoring) is one aspect of this form of sport aviation. Should you have any doubts about the
suitability of the wing for the type of flying you wish to practise or should
you wish to extend your flying in other ways. We recommend that you seek further
guidance from your own instructors or direct from Paramania. Under no circumstances should you
attempt to copy the type of flying that may have been demonstrated to you or
that appears on any video demonstration of the wing without first receiving
proper aerobatics training from Instructors experienced in the use of this
wing.
It
is essential in order to achieve satisfactory performance that proper
consideration be given to the matching of this powerglider with a suitable
harness, motor and propeller. While
we can make recommendations, the choice and suitability of any particular
harness or motor remains outside our control and responsibility.
This
manual will soon be available in French, Spanish and German - please contact
Paramania should you require a different version.
Reference
number RM-UK-1.1 1/06 Written by Mike Campbell-Jones
Copyright (c)
Paramania
2
ABOUT THE REVOLUTION POWERGLIDER
2.1
Design
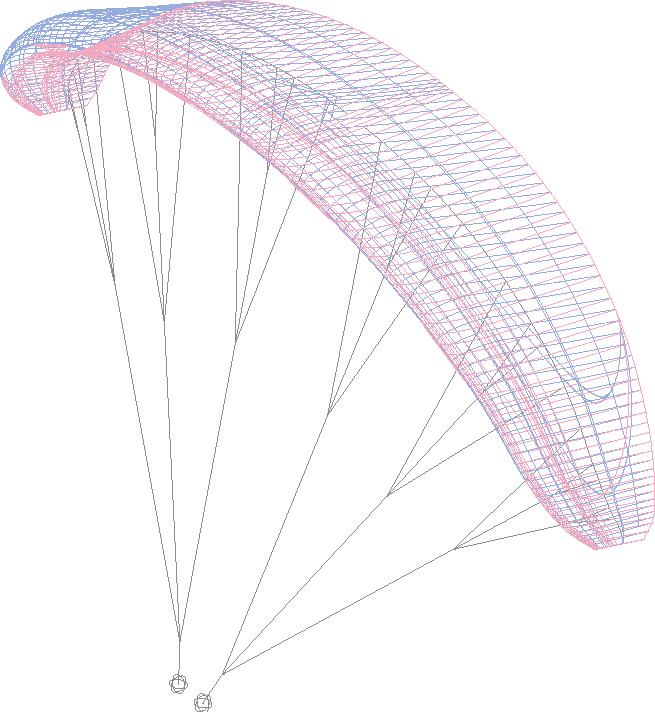
The
Revolution has been designed by Mike Campbell-Jones. His history in the
development of powergliders that exclusively use Reflex wing sections, coupled
with his experience in Microlight aircraft and glider design, means that your
Revolution wing benefits from a wealth of knowledge that spans over 28 years,
back to the early days of hang-gliding.
Microlights
where initially developed as powered hang-gliders that later favoured more
powerful engines and smaller more stable wings. It soon became clear that the
faster your wing, the more often you could use it!
Naturally
it follows, that the concept of a utility paramotor flying machine requires the
same philosophy. So the pilot can spend less time and effort flying actively, in
response to every lump and bump and more time navigating, whilst getting
comfortably from A to B or performing other tasks, such as photography,
observation or general flying.
This
is the revolution!
Although
your Revolution wing has been designed to fly like a conventional paraglider,
the
reflex wing section means that it has an elevator built into its shape. The wing no longer completely dependents
on payload as its only source of stability, It
maintains its own attitude in pitch, rising and falling through thermals and
turbulence, whilst remaining stable above the pilot’s head, requiring minimal
control input.
The
trimmer system allows you to raise the rear of the airfoil, effectively reducing
the chord and surface area by some 30%, giving the wing a higher wing loading
and increased speed without changing the angle of attack. The centre of pressure
also moves forward adding further to the pitch stability. This redistribution of
loading gives the wing exceptional tuck-resistance and increases the working
aspect ratio the result is a faster, more efficient wing under power and at
speed, much
like a traditional powered aircraft.
When
requiring more lift at lower speeds, the rear section can be trimmed down to
restore a fully flapped airfoil, the Revolution changes its characteristics,
becoming closer
to a conventional paraglider with smooth sporty handling, short slow take offs
and steep climb outs. So like having two wings in one.
2.2
Construction
Your
Revolution’s strength and durability has been achieved through careful choice of
modern materials and innovative design. All materials from which it is
constructed are batched and every stage in its manufacture can be traced to a
named operator and checker.
The
top and bottom surfaces are made from the hardwearing Porsha-Marine NCV, 44 and
37gm respectively. The wing tips, leading and trailing edges are reinforced
using a mix of load tape and Mylar. The semi-closed leading edge improves the
air-dynamics, whilst stabilizing lateral movement between surfaces, giving it a
more solid/rigid feel once in the air.
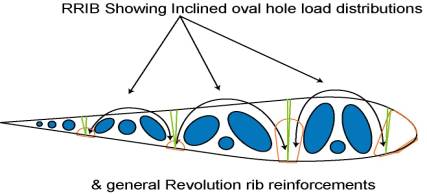 The
structural ribs have been designed with inclined oval ports that allow air to
flow to the areas within the wing where internal pressure is needed most. They
open like valves to increase their area during inflations when the ribs are
off-
The
structural ribs have been designed with inclined oval ports that allow air to
flow to the areas within the wing where internal pressure is needed most. They
open like valves to increase their area during inflations when the ribs are
off-
loaded,
and minimize distortions normally created by conventional holes and distribute
the loads efficiently from the line attachment points into the top surface.
Suspension
line attachments are reinforced in 3 dimensions, vertically with the main rib,
then at an angle with diagonal ribs and 90 degrees with bottom surface lateral
tape. The ribs are heavily reinforced with Mylar wherever the loads are
substantial, i.e. around the “A” and “B’ line attachments.
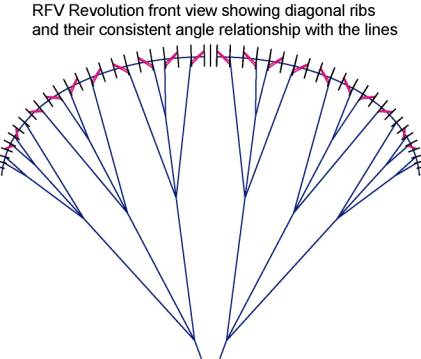
The line
configuration and diagonal rib structure are sharing the same angles throughout
the wing, enhancing the load distribution, whilst ensuring that the lines are
evenly loaded. This we have found gives much quicker inflations.
 All
lines are made of Gin Arimid Technora, the latest in line technology and
incorporates the best qualities of its predecessors, Kevlar and Dynema, It is
both strong and flexible whilst remaining temperature stable, and less prone to
shrinkages when lightly loaded.
All
lines are made of Gin Arimid Technora, the latest in line technology and
incorporates the best qualities of its predecessors, Kevlar and Dynema, It is
both strong and flexible whilst remaining temperature stable, and less prone to
shrinkages when lightly loaded.
The lines are split into 3 categories, Thirtaries, secondary and primaries. Line diameters are 0.6, 1.1, 1.3, 1.6 & 2,3 mm respectively. The larger diameters being the primary lines,
The
malions to which the lines are attached to the risers, are made of polished
stainless steel, which avoids corrosion and gives excellent strength and
durability. The riser material is 1.2K / 25mm polyester webbing. The main
attachment points are reinforced with Cordura, to protect against wear from the
karabinas.
The
Revolution has been built with paramotoring in mind and when new, has a safety
factor of some 50% over and above its tested loading. it has been engineered to
perform to its specifications for about 400 hours.
2.3
What your new Revolution wing comes with
The Glider
User manual
Paramania Ruck-sack (reversible, normal or field)
Stuff sack & compression strap
Speed bar
Basic repair kit
The Revolution is a high-end quality product –
As such it has been fully inspected, firstly by the factory and
secondly by your local Paramania dealer.
Should you not be entirely satisfied with your Paramania
Powerglider.
Please contact your dealer directly. (And if you’re happy contact
them anyway).
2.4 Setting up the controls
Hang check
The following is best carried out by an instructor or at the very
least an experienced motor pilot.
Before flying your Revolution with a motor unit, we recommend that
you do a static hang test.
This is done by hanging your motor unit from an appropriate structure
from the wing attachment points by using a strong rope or strap, then by sitting
in the harness, get an assistant to measure up the risers from the hang points
up. The aim is to make sure that you, the pilot, are able to reach the brakes
whilst in flight. Allowances should also be made for the wind blowing the
toggles out of reach.
The Revolutoin’s risers are shorter than most conventional
paragliders, which reduces the potential problem.
Brake line lengths
The Revolution brake lines come long, they are clearly factory marked
in two places. The risers have a secondary lower pulley system, to allow for
high hang point power units These brake positions should need no adjustments
see diagram RR1 for details
Higher hang points require longer brake lines, lower hang points
shorter ones.
Double-checking brake line lengths (a useful tip)
Again it is better to seek the advice and assistance of a local
instructor or experienced pilot.
Choose a day when there is a steady breeze of about 10Kph.
With an ordinary harness or your motor unit on your back, ground-handle the wing above your head. When the wing is nicely level, check that when the brakes are up against the brake pulleys that the trailing edge of the wing is not being pulled down. Then as you gently pull the brake you should have only a few centimetres of movement before the brakes start to pull down on the trailing edge of the wing. Make sure it is the same length on both sides. Note: - it is safer to have this adjustment too long than too short.
New gliders leave the factory
rigged for high hang points.
Note: - When free flying the wing should be set up though the top
pulley and with the shorter lines
3.1 Flying With
and Without a Motor
Although
the design philosophy of the Revolution is that of a high-speed paramotor wing,
which performs well as a free flying glider and may be flown as such with no
adjustment. Slower trim settings, reduce internal air pressure and consequently
give a lighter feel to the brakes and a better sink rate.
The main
difference in the Revolution compared with other paragliders is the increased
resistance to tucking, both on launch and in flight; its greater speed range and
stability means that generally, it can be flown in stronger conditions safely.
Basically the glider becomes more stable the faster you fly.
First
Flights
We
recommend that, to give yourself the chance to get used to it, your first
flights should be made on the fixed range of trim settings, where, the
Revolution will feel more familiar, like a conventional wing. With this trim try flying with a small
amount of brake - at the point where they just begin to feel heavier. In
practice, this point will be encountered at about the one-quarter-brake
position.
When you
have become fully confident in your wing, try experimenting with slower and faster
trim-settings, weight-shift and speed bar and enjoy the extra speed and security
the Revolution gives you.
3.11
Launching
Forward
launch - We
recommend that when the wing is laid out, that all the lines are at full length
with little or no slack between wing and pilot. Then pull the brake lines in, to
ensure that the middle inflates first. The Revolution is easily inflated by
using “A” riser’s only. When
launching simply move forward from this position pulling on the “A” risers,
whilst keeping the pressure balanced between each side (meaning the tension on
the “A” risers). The glider shows little or no tendency to dive overhead, so
frontal collapses which so often lead to failed launches, are rare. Instead the
glider almost waits for you to catch up with it.
Note:-
Too forceful a pull on the “A’s” may crumple the leading edge and hinder the
launch. Indeed in certain trim positions the Revolution requires no pull at all,
just accelerating forward movement only.
Reverse
launch – Yet
again, the glider is very easy to launch because it does not over-shoot, so the
pilot has little or no need to hold the wing back before making the turn.
Reverse launches on this wing can be carried out in as little as 5 Kph.
In
Flight
In
flight the greater speed range of the Revolution may require some
management. But once you have
mastered how to use the speed to your advantage it becomes pure fun. Its tight handling allows you to make
the best use of thermal cores, and its glide at speed means less time is spent
in sinking air masses before reaching the next thermal. Limits have been
provided to the range of the trim settings to avoid the danger of stalling when
flying with the trim pulled right down and with maximum brake. With the trim fully released, the wing
takes on more solid characteristics, carving through the air with even more
pitch stability. The brake pressures increase and so does the range of movement
prior to the stall point. Turns and rate of roll are linked in a linear fashion
to the progressive feel of the brakes.
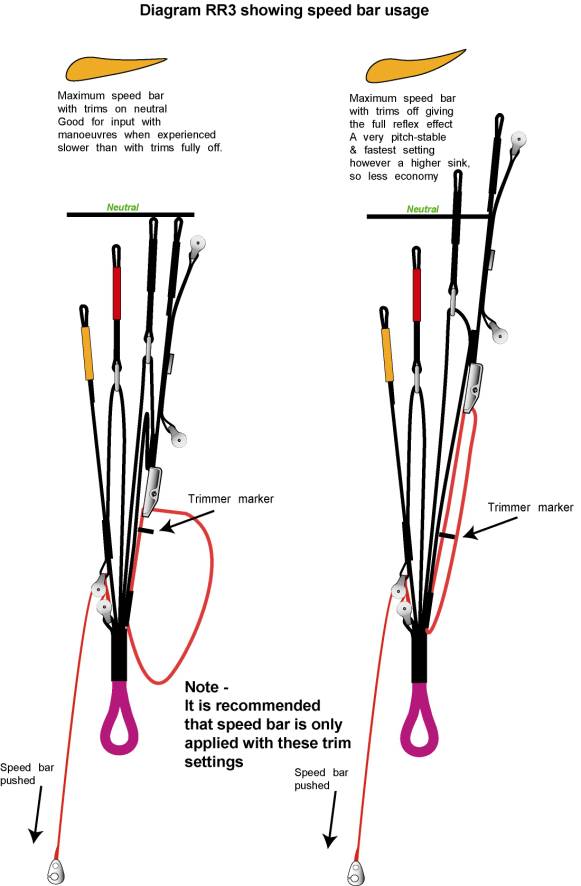
Use of
the speed bar
The bar
increases the speed by approximately 30%. Unlike most wings there is little or
no loss of stability, in fact the wing seems to cut through turbulence even
better than before application. However, if any instability is encountered due
to excessive conditions it is recommended to release the bar for recovery and to
return to normal flying mode. The brake pressures also increase when the bar is
used, so it is more for use during straight and level flight.
Although
the speed bar can be used with confidence throughout the whole range of the trim
settings, it is obviously most effective when used with the trims off I.e. on
the fast setting.
Landing
The
Revolution has a reasonable glide so good planning is required on approaches.
The brakes, light at first, become progressively heavier over a healthy amount
of travel, giving plenty of warning of a stall. With trims on slow the wing
lands like any other paraglider, plenty of air speed on approach, progressive
flare, converting speed into lift, till the moment of touchdown. When landing
with the fast trim on, the process of bleeding off the extra speed to land can
take longer and require more space. In this mode there is a lot of stored
energy, so you may find yourself climbing out again if you aren't that smooth on
the controls. Having said that, the brakes are very powerful. The last bit of
brake travel really shuts the wing down and slows you up.
It does
not take long to develop the confidence to fly in stronger winds than normal,
but great care must be taken when flying fast near the ground. The Revolution stores energy well, so
whilst it is possible to bleed off your speed without losing height before touch
down, respect must be shown for the higher speeds possible, especially in slope
landings.
On
landing in high winds the glider may be deflated with confidence using a strong
pull on the rear or B risers.
3.2 Flying
Under Power
NOTE:
Thorough pre-flight checks for glider, harness and engine are essential prior to
any launch.
For powered flight many of the characteristics are the same as in the
previous section (3.1), However there is a certain amount of additional
information, particularly where the addition of the thrust of the power unit and
correct matching of the wing to the motor unit is concerned. Paramania
cannot be held responsible for the multitude of combinations that may get used,
however if you wish to contact us we can offer some advice.
3.2.a Forward Launching the
Revolution in Nil Wind
While there
may appear to be no wind this is rarely the case and it is essential for
aircraft of this type to take off and make the initial climb out to a safe
height (depending on the surrounding terrain) into wind. This makes maximum use of the wind and
avoids the danger of losing airspeed when climbing out steeply through wind
gradient. Particular attention must
be paid to trees, power lines and other large obstacles and any rotor that they
may generate.
Preparing
the wing
Lay the
glider out, downwind of the motor, so that the lines are fully extended and as
if attracted to the motor or central focal point, then lay the risers down ready
to clip in.
Set the
trimmers to the take off position (Faster settings may be desirable in stronger
conditions, see diagram
RR2). Make sure that when warming up the engine you do
so upwind of the wing, then stop it whilst clipping in.
After
carrying out the following checks: -
Pilot
prepared – clothing safe?
Helmet
on and fastened?
Malions on risers?
Trim set?
Nothing likely to foul the prop?
Speed bar system running freely and out of harm’s way?
Steering toggles and brake lines free and not twisted?
Engine delivering full power?
Airspace
is clear for take off?
Attach
the glider; proceed with the launch (as in section 3.11 Launching).
From now
on you should try to control the glider whilst facing forwards. If the wing is
low behind you and you turn around the lines will trail over the propeller. However, falling backwards onto the
motor is both dangerous and expensive and must be avoided at all costs, even
that of a few damaged lines!
During
the launch, If the pressure on each of your hands feels even, open the throttle
to full take off power, leaning backwards against the thrust so that the engine
is pushing you along the ground rather than into it.
It is
best to try and leave the brakes alone and just let the canopy come up. If it starts to go off to one side,
increase the pressure on the riser on the lower side, whilst moving sideways
towards it and the centre of the wing. Where possible maintain the direction of
your launch. If the wing starts to drop backwards, increase to pressure on both
“A” risers to help it up,
as you increase power, try to maintain a constant angle with the motor and
smooth power control. Any sudden changes will alter your course because of the
powerful gyroscopic and torque effects.
If the
canopy is so far off to the side or behind that it cannot be recovered, kill the
engine and abort the take-off and reassess the launch conditions.
As the
canopy comes up the drag reduces, it should stabilize over your head without
overshooting you. This is a good time to check that your wing is nicely inflated
and that there are no tangles or lines fouled, but this must be done whilst on
the move and without turning. When you feel the resistance reduce, allow your
run to accelerate. Feel for
pressure on the brakes, coming down on them as required to steer or to increase
lift for taking off.
Points to note:-
Þ If your
propeller protection cage is flimsy enough, the pressure of the lines on it
during launch may distort it to the point where it fouls the prop. If this is the case make sure the lines
have cleared the cage before you open the throttle.
Þ All
control inputs should be smooth and progressive.
Þ Don’t
attempt to take off if the canopy isn’t roughly level overhead. Dangerous oscillations may result if you
apply full power with it too far off to one side.
Þ Keep
your undercarriage down until you are definitely flying!
Þ The
faster the trim setting, the more brake the glider will need to get off the
ground.
3.2.b Reverse Launching in Stronger
Winds
Because
the Revolution launches so easily it is possible to perform a reverse launch
with both front risers and one brake in one hand and the throttle and opposite
brake in the other. If the wind is
appreciable this is the easiest method of launching, but if the wind is light
the difficulty of running backwards safely with a motor on makes a forward
launch preferable.
It is
wise not to open your Revolution out to the point where it is liable to be
caught by the wind until you are ready to launch, especially if it is already
connected to your motor.
Lay the
folded glider on its back with the trailing edge pointing into the wind.
Unfold
it sufficiently only to locate and untwist the risers and check that no lines
have gone over the leading edge.
Extend
the risers upwind as usual, separating left from right.
We
suggest that you pre-twist the risers over each other half-a-turn in the
direction in which you wish to turn during launch and lay them out in this
position with the rear risers uppermost.
This is because, once clipped in, the propeller cage on your back makes
it virtually impossible to turn without assistance when the wing is on the
ground.
Carry
out your standard pre-flight checks now.
Having
started and warmed up your motor upwind of the canopy, attach yourself to the
power unit, face the canopy, approach the risers and clip them on to the
appropriate malions.
Build a
wall first using front and rear risers simultaneously. We recommend that you momentarily raise
the glider off the ground to check for tangles and line snags.
Holding
risers, brakes and throttle control as outlined above, pull the front risers up
to lift the glider over your head.
It is unlikely to over-fly you, especially if it is trimmed to fly
fast. This may be contrary to what
your paragliding intuition tells you, but on the fast setting (trim fully off)
the Revolution’s reflex wing section stabilizes the wing and prevents it from
pitching forward. It may even sit back a little but applying a small amount of
brake makes it pop forward.
When the
glider is steady above you turn round, apply power and take off. As with forward launching, the
trim/power/brake relationship must be established for the best rate of climb and
forward speed.
Points
to Note:-
Þ This is
a cross-hands reverse launch. You
must master this technique before attempting it under power. Your local Paragliding School will
assist you here.
Þ All
control inputs should be smooth and progressive.
Þ Don’t
attempt to take off if the canopy isn’t roughly level overhead. Dangerous oscillations may result if you
apply full power with it off to one side.
Þ Keep
your undercarriage down until you are definitely flying!
Þ The
faster the trim setting, the more brake the glider will need to get off the
ground.
Þ Speed
systems may cause problems when clipping in. Don’t get your lines
crossed!
3.2.c The Climb Out
Once off
the ground and flying safely, continue into wind using the brakes to achieve the
desired climb rate. Don't attempt
to climb at too steep an angle. Attempting to use too much brake to force a
higher climb rate will only degrade the climb by creating extra drag and with
the addition of lots of thrust could result in a stall or a spin.
Under
power the Revolution behaves more like a powered fixed wing airplane than a
paraglider, and it helps to think of it as such. Provided there are no obstacles in your
path, it is often safer, and quite spectacular, to fly level with the ground
after take-off gaining more speed before converting it into considerable height
using the brakes and then easing off into the climb out.
The
other reasons for not climbing out too steeply are the risks involved when
having engine failure, i.e. a stall and diving recovery. Although the Revolution will not sit
back behind you the way that some gliders may, a slow forward speed and high
angle of attack is still likely to put you into a near stalled attitude if your
power source suddenly goes on strike.
In this situation you should always be able to set up a reasonable
approach, so don't make things hard for yourself - fly with sufficient airspeed
at all times, and keep your angle of attack under control a low altitudes.
Depending
on the geometry of the set-up of your power unit, the propeller’s torque effect
may make itself felt as you leave the ground. Expect it to turn you and, if necessary,
steer against it in order to maintain your direction. However, when countering the torque
effect during a steep climb on slower trim settings under a lot of power, care
must be taken to avoid the risk of stalling.
Because
of the large vertical distance between the thrust line of the prop and the wing
common to all paramotors, the extent of the power management required is
critically dependent on your set up and flying ability.
Power
induced Oscillations
Certain
combinations of weight, power, and propeller size can cause oscillation where
the torque and gyro effects lift the pilot to one side, you then drop back only
to swing up again. To counter this
you can:-
·
Alter
the throttle setting.
And
/or
·
Adjust
the torque strap if fitted.
And/or
·
Shift
your weight in the harness.
And/or
·
Adjust
the trimmers to dampen it out.
Weight
shift is the best counter.
Oscillation usually occurs on high power settings - more power and a
larger propeller causes more oscillation. It could be that your control inputs
are amplifying the oscillation. In
this case, throttling back a little and flying hands-off should take care of the
problem.
Having
said all this, it is quite common for inexperienced pilots to be too busy on the
controls, this is referred to as pilot induced oscillation, and the simple
answer is stop moving your hands
3.2.d Level Flight
On
reaching a safe height after take off, and if you wish to go cruising, turn on
to your chosen heading, reach up and release the trimmers if on a slow setting
and if you like let go of the brakes completely. If conditions are very rough you may
wish to keep hold of them, however the Revolution is even more stable at
higher speeds, so we suggest you let go and enjoy the flight.
Note
–All paramotors should have adequate netting to prevent toggles entering
propellers whilst in flight – check yours!
If
you have one, keep an eye on your alti/vario. in level flight - it is easy to
creep into a climb without noticing.
Use the information from your instruments to optimize your forward speed
and reduce drag and fuel consumption.
This will all be specific to your own set up. With its hands-off flight capability,
the Revolution is good at letting you do this.
With a
sound understanding of the current wind conditions at different altitudes and
intelligent use of any thermal activity, wave, convergence, ridge or frontal
lift it is possible to conserve your fuel and greatly extend your operating
range. The engine of course makes
it easy to put you in the right place at the right time to exploit the
conditions. Don't be afraid to throw the Revolution into a tight thermal to gain
height and save fuel - you will find it is particularly good at coring
thermals. Using slower trim
settings will allow you to climb faster in thermals.
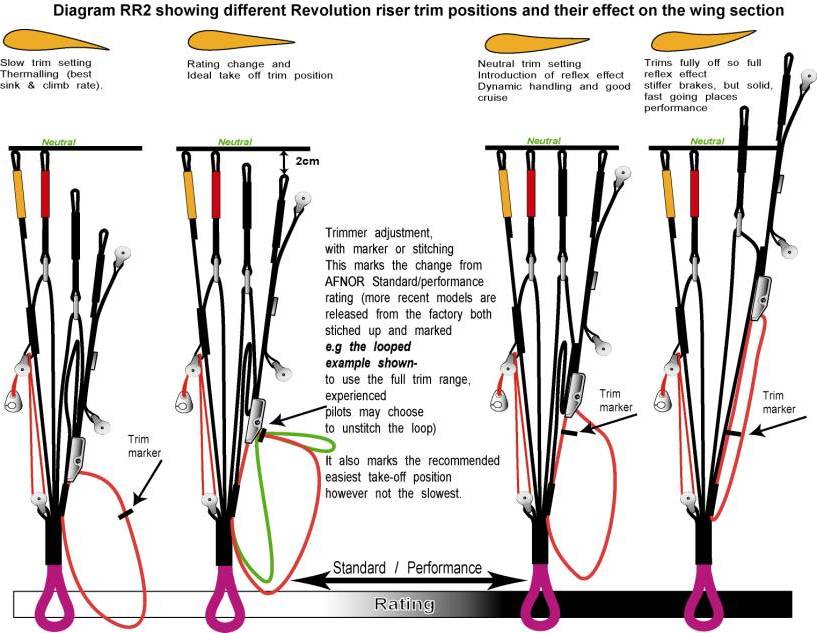
3.2.e Using the Trimmers and Speed
Bar
The
Revolution’s reflex wing section is unique in this way, it basically has a huge
range of trims and speed bar waiting for you to explore. We only ask that you
explore the full flight envelop at a safe height and with adequate training and
experience.
 When the
Revolution was tested under the AFNOR system, it was awarded a “standard” rating
at the slower trim settings and a “performance” rating at the faster settings.
Despite it having improved tuck resistance at the faster settings. The extra
speed involved, means a higher energy recoverys.
When the
Revolution was tested under the AFNOR system, it was awarded a “standard” rating
at the slower trim settings and a “performance” rating at the faster settings.
Despite it having improved tuck resistance at the faster settings. The extra
speed involved, means a higher energy recoverys.
The
exact trim position where the Revolution, changes over its rating category is
clearly outlined in the diagram beside. (It is the same for all current sizes).
However some of the earlier models are only marked where later models are
stitched. VIP Note: - So
when a pilot unstitches or uses the trims above this position he/she is flying
this wing in the performance category.
Remarkably,
the Revolution has a huge and relatively safe speed range, nearly 4 1/2 times
greater than its stall speed compared with most air-craft that only have between
2-3 times.
With the
trimmers fully off the wing’s speed and stability increases and hence its
ability to cut through turbulence and go places improves. On faster trim or
speed bar settings, brake pressures generally increase and weight-shift or a
wing tip stabiliser becomes more effective.
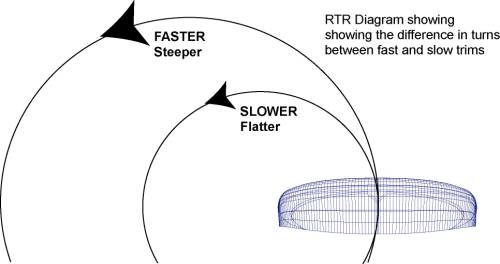
On the
slower settings, sink rate improves and handling becomes lighter enabling you to
make best use of thermal cores. Whilst giving you an improved climb rate and
shorter slower take-offs and landings. See diagram RTR below describing
differences in turning radii.
For
correct usage, first study the RRD diagrams 1,2 & 3, showing trim and speed
bar movement as well as speed bar hook-ups. The diagrams also show you the
effect on the wing shape relative to the different settings.
Points
to Note:-
·
Remember,
trims and speed bar are controls are extra items for your pre-flight
checks!
·
If the
trim settings inadvertently become asymmetric, the wing just crabs. Likewise, if lift is dumped, by
releasing the trimmers accidentally, the Revolution’s reflex wing section keeps
the wing above your head and you just lose some height while accelerating.
·
In
general, when flown with the higher the hang point motor units, the wing will
have more of a tendency to dive when entering turns and may also result in
higher ‘G’ loadings, weight shift is also less effective. However often extra
pendulum and lateral stability is gained.
3.3
Landing
There
generally seems to be two philosophies about landing a paramotor - either with
or without power.
3.3.a Power-off Landings
Cut
all power at about 50m and glide in like a paraglider. This minimises the risk of
propeller damage but you only get one go at it - you have to get it right!
With
or without power the Revolution rides out turbulence much better on a fast trim
setting, so if it is rough come in fast, allow yourself plenty of room (like a
hang glider) and bleed off speed before you touch down. The Revolution stores energy quite well,
and it may be necessary to round out and 'float' level with the ground,
converting your excess speed into lift while you slow down, before flaring to
touchdown.
If
you aim at a precision or tight landing, or in nil-wind conditions, it is
advisable to use half or even full trim (maximum lift configuration). This will hardly alter your glide angle
but will decreases your sink rate; these decisions become more critical at
higher wing loadings.
3.3.b Power-on Landings
At
a steady tick over, lose height at a shallow angle, then as you near the ground
level out and bleed off speed before flaring to touch down. Kill the motor as your feet touch the
ground. The advantage of this
method of course is that if you get it wrong you can power up and go round again
at any time. The disadvantages are
the increased risk of (expensive) prop damage if you stuff it up, the dangers
involved in falling over with the engine running and getting your lines in the
propeller if you forget to switch off before the wing deflates.
Points
to note:-
Þ If
possible, know all about your landing area before you take off.
Þ Check
the wind direction before you set up your approach.
Þ Power-off
landings probably need less space.
Þ If
in doubt, practice your approach until you are sure you can land safely.
Advanced manoeuvres
The Revolution has achieved a AFNOR rating for the manoeuvres
prescribed by the test authorities. However it is essential that pilots take
proper training before attempting certain aerobatics.
We also suggest that you seek advice from instructors or experienced
pilots before conducting ANY of these manoeuvres or go flying in extreme
conditions, and that you carry a reserve parachute if this type of flying is for
you.
Big
ears.
This
method is a good safe way of descending, However care should be taken when
pulling down the outer A lines, not to pull them too far, the Revolution has a
lot of load on the “A’s” especially on the faster trim settings. A spiral may be
a more efficient way to get down. Note;- we do not recommend using big-ears with
power, There is a risk of stable stall and it defeats the object.
B-Lining
The
revolution B-Lines well however we recommend that you undertake proper training
as recovery characteristics change through out the trim range. A spiral is a
much safer more efficient way to get down,
Adverse
flight reactions
Cravats
Despite the intensive testing that has taken place. The Revolution is
a modern wing, and in the name of performance it has an efficient line
configuration. This means more gaps in between lines, so always a possibility of
a cravat, this being when some of the canopy makes its way between lines after
recovery from a deflation, either induced by the pilot or through severe
turbulence. Normally pumping the brakes unravels the wing, if not then a sharp
pull on the B’s or D’s usually does the job.
Stable
stall
When any wing has many hours or has been over-loaded, one of the
first signs of degradation is a tendency towards stable stalling. This may occur
whilst exiting a high-energy or advanced manoeuvre.
When a power unit is added, it can even occur during a low airspeed
take-off. Especially when a very powerful engine relative to the pilot weight
and wing loading is used. It is also more likely on the slow speed trims.
Should you find yourself in this situation,
In flight
The quickest recovery is achieved by – coming off the power (if any)
– give a short sharp pull on the brakes in unison, followed immediately by a
firm but even pull on both A’s at once.
During take-off
ALWAYS ensure that your wing is definitely flying with enough
air speed, before opening the gas or pulling on any brakes during any launch. If
it does happen that you have managed to leave the ground but are not fully
flying, DO NOT add more power and more brakes but smoothly come off them,
If the wing does not accelerate, just land. Re-assess the conditions as it may
well be you are trying to climb out through a wind gradient.
Remember: - Stalling is common to all
aircrafts when the pilot takes off with insufficient air speed and then tries to
climb. The thrust line on a paramotor is well below the wing, so adding power
adds to the problem.
All or the previously mentioned manoeuvres and recoveries from them,
are taught on SIV courses. Contact a local instructor or paragliding club for
more Information about SIV.
3.4 GOLDEN
RULES!!!
¨ Never
place your engine downwind of your wing.
¨ Check,
check and re-check the fuel system for leaks.
¨ Have
you enough fuel to get you there?
Better too much than too little!
¨ Check
for any loose articles that could trail or fall into the propeller while flying
and fasten them securely.
¨ If
you spot a problem, no matter how small, deal with it NOW!
¨ Always
put on and fasten your helmet before clipping in to the harness.
¨ Always
carry out full pre-flight checks before launching.
¨ Try
to control the glider on the ground facing forwards so as to keep the lines out
of the prop. You should only turn
to face the glider to avoid falling backwards onto the motor.
¨ Don't
fly into danger - over water, trees, power lines etc. where an engine failure
will leave you in trouble.
¨ Try not
to fly into the turbulence of your own wake or that of others, especially at low
altitude.
¨ It is
unwise to fly hands-off below about 100m. AGL. as an engine failure below this
height may require you to
make
immediate control inputs to set up a landing approach.
¨ Never
rely on the engine: it may cut out at any moment. Always fly as if it will,
so
fly the wing – NOT the motor
¨ Except
for collision avoidance, making a sharp turn against the torque effect during
steep climbs can be dangerous: you may rapidly stall and enter a spin.
¨ Avoid
downwind low flying: it drastically reduces your options!
¨ Be
sensitive to mechanical problems early.
A noticeable change in engine tone or a new vibration may spell
trouble. Land and check it
out.
¨ Make
sure your navigation is up to the job.
¨ Remember,
not everyone enjoys your engine noise.
Care must be taken when flying near livestock.
The
safety and life-span of any aircraft, however well designed, built and flown,
depends in the end upon how well it is cared for. Confidence in your equipment and the
quality of its maintenance is essential to good flying. Even a product as well engineered and
carefully constructed as the Revolution can quickly deteriorate if neglected or
abused. The better you look after your wing, the better it will look after
you.
4.1 Basic
Care
As
with any paraglider, the basic rules for looking after your Revolution wing
are:-
Keep it Cool
Prolonged
exposure to excessive heat in places like the car, the loft or the airing cupboard as well as contact
with hot engine parts can damage and significantly shorten the life of both
cloth and lines.
Keep it Dry
Packing or storing a wet wing may make it mouldy, damage the coating of the fabric, corrode the metal fittings and in
extreme cases rot both the cloth and the lines.
Salt
water is particularly harmful (as
salt crystals form an abrasive coating).
You should avoid immersing your wing if at all possible. If it does happen, rinse it thoroughly in fresh water and dry it out
completely, preferably in the shade, before packing it away.
Keep it dark
U V light degrades coatings and drastically weakens fabrics.
Never leave your wing laid out for long periods beneath holes in the ozone layer. Fold or pack it away when it’s not in the air.
Keep it Clean
Some
dirt can be highly corrosive. Clean off any such contamination as soon as
possible using clean, fresh water.
Don’t use detergents: they can cause as much damage as the stains, if not
more. In particular, store and
transport your wing away from the motor (never in the same bag) to avoid
any contact with oil or petrol.
Keep it Clear:
Sharp, hard or abrasive items such as helmets, flight instruments, harness buckles and the like can accelerate fabric wear and even hole
the wing. The drawstring stuff-bag provided with your canopy affords a measure of protection but you
should
still try to ensure that you store and
transport it clear of contact with anything likely to damage it.
Keep it Lonely:
Even insects, such as grass-hoppers and ants will simply eat their way out if rolled up with the wing. Grazing cattle can literally lick the
coatings
off the fabric and mice love to make homes in canopies!
Above all, remember that for all its portability, your paraglider is an aero plane and deserves to be treated as such!
4.2 Periodic
Maintenance
Although
your Revolution powerglider, is designed and engineered to give you at least 400
hrs of air time, regular maintenance is essential to pinpoint any problems that
may arise as a result of routine wear and tear and is especially important after
any incident which may have resulted in fabric or line damage that may not show
up in the course of pre-flight checks.
Paramania or its accredited agents will, for a small charge, carry out a
specified program of maintenance checks designed to keep your wing in tip-top
shape and certify its condition in a written report that will become a valuable
part of its service history.
Paramania
takes great pride in the quality of both its product and the service that
supports it. Feedback from periodic
maintenance checks performs a vital role in its quality assurance
procedures. They are therefore just
as important to us as they are to you and you can be confident that all such
checks carried out by the manufacturer are comprehensive and thorough.
We
recommend that these inspections are carried out annually or after every 100
flying hours, whichever is the sooner.
They are, of course, an essential addition to rather than a substitute
for the canopy and line inspections that form part of your own pre-flight
checks.
4.3
Repairs
A
repair kit is provided with your Revolution powerglider that allows you to carry
out small-scale emergency repairs.
It consists of about 1 metre of each nylon fabric used in its
construction, in self adhesive rip-stop tape and two spare suspension lines,
looped at both ends and of the same length and thickness as your longest
primary.
Damage
beyond the scope of this kit to deal with and more major repairs that may be
necessary to loaded parts of the wing’s structure, such as seams, line
attachments, ribs, risers, leading and trailing edges etc. should on no account
be carried out by anyone other than a Paramania accredited agent or at the very
least a qualified parachute rigger.
The
manufacturers can accept no responsibility for repairs, however minor, carried
out by anyone other than themselves nor for any damage to the wing resulting
from accident, neglect, negligence or abuse. In all such cases any statutory rights
and obligations of guarantee are automatically cancelled.
4.4 Care and
Maintenance of your Power Unit
This
manual refers only to your Revolution powerglider and any issues to do with the
Power Pack you are using is beyond its remit. Refer to the relevant literature
for details of care, maintenance, servicing and repair concerning your motor and
harness. However we can offer advice if requested.

5.1
Riser
Diagram RR1
Showing
riser layout and hard ware
5.4
5.5 Lining
Tables
Below are lining diagrams & tables. The lines are
configured so that most profile changes take place in the tertiary lines,
meaning that they are all different lengths enabling the secondary and primary
lines to be a more standard length. Lines are numbered from the middle. These
are the lines most often damaged or in need of changing, when a full service is
carried out. a spare primary line comes with your repair kit, just in case you
catch one in a propellor.


We would
like to stress again the points made in Section 1 of this Manual.
The
Revolution Powerglider Manual is subject to continuous updating.
To assist
us in our quest for perfection, we would appreciate any input that you the
customer may contribute towards future versions.
Please
don’t hesitate to contact us to let us know your views.
Wishing
you many hours of fun on your Revolution Powerglider.

PARAMANIA
Web Site
: http://www.flyparamania.com/
E-Mail
: info@flyparamania.com